Friday, 2 November 2012

November already!!!!!  Where does the time go?  I'm trying to work on Christmas projects....but I just can't get into it much yet.  I'm sharing a little project I did the other day.  It's a wood block Christmas tree.

I started with 3 different sized wooden blocks.

Here's what you will need:  blocks, glue or decoupage, assorted Christmas scrapbook papers and distress ink.
Glue all the pieces of paper to all sides of your blocks.
Distress all the edges of the blocks, then glue them together.  This is side one.
Side two.  You could drill a small hole in the top and glue in a piece of twine to make it a decoration.

I hope this has inspired you to be a little creative.
Blessings Sherry


Tuesday, 30 October 2012

Happy Tuesday!!!

First off.....I'd like to send out a prayer to all those on the east coast of Canada and US to keep safe during Hurricane Sandy!!!!

Today I just have a short little blip.  A before and after picture of a little sign I upcycled.  I'm having lots of fun on some little projects I'm working on.

BEFORE:  Cute....but not very shabby or chic!

AFTER:  Much more shabby chic.

I have a few more of these signs that I will be transforming!

Enjoy your day.  And keep safe.

Blessings Sherry


Thursday, 25 October 2012

Hello Everyone

I have been very busy moving things to my new temporary home.  My friend and one of my consignors, Lorraine, has gone to California for 5 months and I get to live in her very SHABBY CHIC home.  It is amazing!!!  I will be posting picture later on.  But today I want to show you a box that I upcycled.  It is a cardboard band box.  It had a company logo on the top (sorry I forgot to take a before picture).

I gave it a few coats of Crisp Linen paint.  When the paint was dry, I rubbed the box with some "Distress Ink" in the color vintage photo.


The finished product.  I decoupaged some script paper, then glued on some lace, flowers and buttons.  Decoupaged a picture of a cute little girls.  I love the way it turned out. Ready for some little treasures.

Blessings
Sherry

Friday, 19 October 2012

TGIF!!!!

Hello

Well as promised....I'm posting the finished magnetic memo board I made for Leola.  I made 4 all together.  The one below has vintage lace trim on the bottom (because I made the first picture too short...oops).  The rest are just plain.  And they all have 3 vintage buttons made into magnets.

Hope you all have a great weekend.
Until next time
Blessings Sherry

Thursday, 18 October 2012

Happy Thursday!

Do you ever have one of those days when you want to do 100 things, but you run around so disorganised that you don't get anything accomplished?  Well I am having one of those days.  I've been looking at blogs and getting so inspired to create, but can't seem to get very far today.  I did finish up a few little projects....a cute little shelf and some old vintage shoe brushes.  Graphics are from graphicsfairy.blogspot.ca


My friend Leola from leolasstudio.blogspot.ca asked me to make some magnet boards for her.....so that is another project I'm working on.  I start with a plain metal board.
Then I decoupage a picture that I've printed from my printer.  It is one of Leola's shop.  I love the picture.  I will share the finished project with you tomorrow.
Photo by Nick Allens Photography
Here is one that I did for Halloween with a picture of 2 black cats.  The magnets are black glitter!  Love sparkle!

Well I better get back to work if I want to get these done for tomorrow.

Blessings
Sherry


Friday, 12 October 2012

TGIF!!!

I just wanted to share a few pictures of the Halloween items that are in the shop.


Hope you have a GREAT weekend!

Blessings
Sherry

Wednesday, 3 October 2012

Can you believe it's October already!!!!  I've been busy working on projects at the shop.  I've had this old wooden blue tool chest for a while now and it hasn't sold.....sooooooo.....I thought I'd give it a make over.

I already started the makeover when I remembered to take a "before" picture.

 I gave it a few coats of "Crisp Linen".  And then traced a graphic I got from graphicsfairy.blogspot.ca and filled it in with a Sharpie permanent marker.


The finished project.  I like it so much more now.  Wouldn't it look wonderful filled with fall foliage and some little pumpkins!

Enjoy the day
Sherry 

Sunday, 30 September 2012

Happy Fall!!!!

It's been so beautiful on Vancouver Island.  I love each changing season and the different decor and crafts that go with them.  I'm into the "Pumpkin" thing right now.


Some of the little fabric shabby chic pumpkins I made.


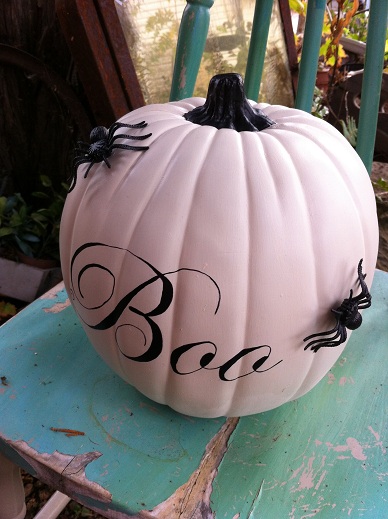
The large white pumpkin is one I bought from Michaels (it was orange and I painted it white).  Then I traced the word BOO onto the pumpkin and filled it in with a black Sharpie permanent marker.


Painted the stem, gave it a coat of clear varnish and added a few spiders.....DONE!


Until next time
Sherry


Tuesday, 18 September 2012

Awesome Weekend

Good Morning!

I had such a great weekend!  Saturday I went out "treasure hunting" and found lots of cool things....including an old vintage screen door with cut out hearts in each corner AND it was already painted off white.  I've always wanted one.  Also on Saturday, I had great women stop in the shop.  Love meeting and visiting.....so interesting and creative people.

So now I have all these new projects to work on (on top of the other 200 I already have).  So yesterday I was cleaning them and getting them ready to paint.  I found this cute little blue shelf unit that I thought I could just wash and paint over top.  When I started washing it....the painted started to peel off.  It became very elasticy (I know, not a word, but that is what happened). I could just pull the paint off when it was wet.  Below are a few pictures.


It's important to prep your piece right.  I like to lightly sand, clean, and use a good primer like Zinsser.  Or you can use chalk paint.  I plan on doing some experimenting this week with home made chalk paint (adding plaster of paris to your paint).

Wishing everyone a fabulous week.
And DREAM big.
Sherry


Tuesday, 11 September 2012

Welcome! 
 This is my first time as a Blogger!  I must warn you...I have terrible spelling....even with spell check!!!

I have always dreamed of having my own little shop and in February 2012 that dream came true.  I have a little shop called "Vintage Treasures".  It's located in the quaint courtyard at Whippletree Junction in Duncan, BC.  I fell in love with Whippletree the first time I visited there in 2008.  I have met some wonderful people here.  It's become like a second home.

I love treasure hunting for unique things that can be repurposed or upcycled and crafting of course.
I will keep you posted on projects I'm working on.

Today I tried a technique I saw online.  Where you print an image onto tissue paper and decoupage the image on a canvas. I came across an image I knew Leola (a wonderful fellow merchant at Whippletree) from leolasstudio would like....so I thought I would make it for her.


Supplies:  Canvas, tissue paper (taped onto cardstock), Modge Podge
canvas
Image printed on tissue paper


Final result


I love how it turned out. I antiqued the edges and gave it a top coat of decoupage.  It makes it look like a real painting on canvas.The picture does not due it justice. Leola loved it, by the way!!!  Such a lovely lady :)

Well that's it.  I DID IT!!!!  Blogging has begun. Big sigh.

Until next time
Happy thoughts
Sherry